OnOne Perfect Photo Suite 5.5

Download Via Maknyos
Cara Install :
1. Install Pluginnya
2. Buka di Start Menu>onOne Software>Perfect Photo Suite 5.5> License Manager & pilih lewat phone activated
3. Buka keygen nya,copas nomer nya
4.Enjoy...
1. Install Pluginnya
2. Buka di Start Menu>onOne Software>Perfect Photo Suite 5.5> License Manager & pilih lewat phone activated
3. Buka keygen nya,copas nomer nya
4.Enjoy...
Noise Ninja 2.2.0

Noise Ninja is the most effective and productive solution for removing noise and grain from digital photographs and scanned film images. It is a must-have tool for anyone shooting in low-light or fast-action situations -- including news, sports, wedding, and event coverage -- where high ISO photography is required and the resulting noise compromises the image.
Perfectly Clear Plugin 1.5.5

Perfectly Clear Photoshop Plug-in (WIN) instantly gives you one click photo correction perfection. Simply load the Plug-in and your selected photo will be automatic corrected. It works on both 8 bit and 16 bit images within Photoshop (raws are converted using Adobe Camera Raw). All the same corrections and presets available in our stand-alone are also available in our Plug-in. Download <<<
Topaz Bundle Plugins 32/64bit
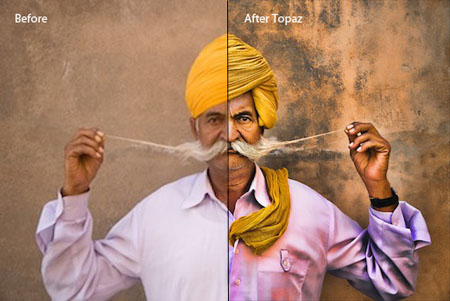
Plug-in Contents - Updated 21-Nov-2010
* Topaz Adjust v4.1.0
* Topaz Clean v3.0.2
* Topaz DeJPEG v4.0.2
* Topaz DeNoise v5.0.1
* Topaz Detail v2.0.5
* Topaz InFocus v1.0.0
* Topaz ReMask v2.0.5
* Topaz Simplify v3.0.2
Install / Register Notes
-Install setup
-When prompt for a directory folder to install
-Navigate to your Adobe Photoshop Plugin Folder (Default)
*C:\Program Files\Adobe\Adobe Photoshop CS5\Plug-ins
-Run Photoshop, open an image file
Click Photoshop [Filter] tab & select Topaz Labs Plug-ins from drop-down list
Click Topaz Plug-in [Menu] tab > Enter Key
-Use Key.txt information
Nik Software

Nik Software, Inc. is a privately-held American company that develops software solutions for the growing digital-imaging and photography markets. Established in 1995, Nik Software has become the recognized leader in digital photographic filter development and produces award-winning technology and plug-in products for digital photography and imaging professionals including U Point® technology, Dfine®, Viveza®, Silver Efex Pro™, Color Efex Pro™, and Nik Sharpener Pro™ software.
The company’s products use a range of innovative technologies that make digital imaging and photography easier and more powerful. Nik Software is headquartered in San Diego, California with branch offices in Germany.
The company’s products use a range of innovative technologies that make digital imaging and photography easier and more powerful. Nik Software is headquartered in San Diego, California with branch offices in Germany.
Toy Camera AnalogColor

Name: Toycamera AnalogColor 0.3.9
Publisher: pentacom
Description: Toycamera AnalogColor is a great photo editing application that allows you to transform digital images to analog-like pictures, but also lets you add a Polaroid styled frame.
Publisher: pentacom
Description: Toycamera AnalogColor is a great photo editing application that allows you to transform digital images to analog-like pictures, but also lets you add a Polaroid styled frame.
Tiffen Dfx V2.0.2.1.8710 for Adobe Photoshop

The company produces a wide range of Tiffen filters for the established objectives updated Dfx V2.0.2.1.8710 Plug-In Editions - software system is being implemented as a plug-in Adobe Photoshop & Elements consisting of more than 2000 different filters, special effects, prisetov, gels, including the simulation of many popular glass filters realistic simulating the effect of filters for color and density, three-dimensional image characteristic of diffusion filters.
DxO Optics Pro v6.2.0 Build 7826
Key features:
• Optical photo correction
• Converting RAW files to other graphic formats
• Optimize species photographs
• Excellent work with the distortions and distortsiey caused by the optics
• Removal of various noise, dust and other distortions
• Easy to use thought-out interface
• Ability to work with Photoshop, Lightroom and Flickr
New in version 6:
• Improved image quality at high ISO
• Improved tools for correction of optical defects
• Automatic restoration of exposure for the most difficult subjects
• Completely redesigned and more intuitive interface
• Personalization of the interface to improve productivity
• Support for new cameras and lenses
• Improved performance of the overall program.
Download <<< 32 Float 1.0.1.6703 for Adobe Photoshop

32 Float – Key Features
• Provides unprecedented 32-bit image editing tools for Photoshop via filter plug-in.
• Compatible with Photoshop CS3, CS4 & CS5.
• Full support for 64-bit computing architecture (x64) on Mac and Windows.
• Enables local HDR editing on 32-bit images via layer masks prior to tone mapping or return tone mapped images to 16 or 8-bit to Photoshop.
• Accepts 8, 16 & 32-bit RGB images as input from any source in Photoshop.
• HDR image brightness histogram with visible range indicator and digital readout for RGB and Bch values.
• Based on Unified Color's patented Beyond RGB™ color model, allowing for tonal adjustments without color shifts or halos.
• Adjust HDR tonal range with Brightness/Contrast, Local Contrast, Shadow/Highlight and Veiling Glare correction tools.
• Adjust HDR color with White Balance, Saturation and Selective Color Tuning Controls.
• Best of class halo reduction algorithms.
• Perform Sharpening and Noise Reduction on 32-bit Images.
• Single click Dynamic Range Mapping tool.
• Save favorite settings as presets.
• Save favorite processing steps as recipes to apply to other images.
Unified Color HDR Expose v1.1.0.6703 win32+64

HDR Expose – Key Features
* Includes stand alone application as well as plug-ins for Aperture and Adobe Lightroom
* Cross platform design for Windows and Macintosh operating systems
* Full support for 64-bit computing architecture (x64) on Mac and Windows.
* HDR image brightness histogram with visible range indicator and digital readout for RGB and Bch values
* Based on Unified Color's patented Beyond RGB™ color model, allowing for tonal adjustments without color shifts or halos
* Dynamically control workflow with "HDR Image Tools" side panel
* Adjust HDR tonal range with Brightness/Contrast, Local Contrast, Shadow/Highlight and Veiling Glare correction tools
* Adjust HDR color with White Balance, Saturation and Selective Color Tuning Controls
* Best of class halo reduction algorithms
* Perform Sharpening and Noise Reduction on 32-bit Images
* Single click Dynamic Range Mapping tool
* Save favorite settings as presets
* Save favorite processing steps as recipes to apply to other images
* Supports working with multiple open images via tabbed document interface
* Refined parameters for extreme adjustments to Veiling Glare and Dark Noise reduction
* Selectively adjust hue, chroma and brightness values for up to three separate colors in Color Tuning tool
* Supports RAW files from most popular DSLR cameras also adds improved merge algorithms for extreme recovery of color data from JPEG/TIFF sources
* State-of-the-art merge procedure produces highly precise image alignment
* Improved de-ghosting algorithms with 3 options: natural, sharp edge & smooth edge
* Preserve 32-bit files by saving them in .Bef, Radiance .HDR format, OpenEXR, or TIFF formats
Retro Machine 4

Most Requested New Features
For years customers have been suggesting new features and ideas to improve our plug-in and we listened!
* It's Downloadable! - No need to wait a week for your new software to arrive now that you can order online and download right away!
* Texture Effect Picker with Live Preview - It's now faster and easier to find and preview the perfect texture in real-time on your images without wading through every texture effect. You can also filter the effects by style and set name.
* Apply Wash Effect on Mask Layer - Now you can apply our popular Wash effect in the image mask layer allowing you to fine-tune the Wash effect while leaving the original image untouched*.
* Presets are Here! - Now you can create and save as many presets as your heart desires to recall your favorite plug-in effect settings. To help get you started we came up with plenty of our own factory presets to show off the rich new features of this plug-in!
Knoll Light Factory for Photoshop 3.2

More than 100 Presets
Over 100 customizable presets (50 new in 3.0) give you additional pre-made Photoshop lighting effects that range from naturalistic to dramatic.
Over 100 customizable presets (50 new in 3.0) give you additional pre-made Photoshop lighting effects that range from naturalistic to dramatic.
Customize with Light Elements
Light Factory's custom lens editor lets you combine and tweak any of 19 basic light elements such as Glow Ball, Spike Ball, Chroma Hoop, Ellipse, or Sparkle to generate custom light effects.
Light Factory's custom lens editor lets you combine and tweak any of 19 basic light elements such as Glow Ball, Spike Ball, Chroma Hoop, Ellipse, or Sparkle to generate custom light effects.
Imagenomic Noiseware Professional v4.1.1.0

Noiseware enables you to restore image quality by eliminating digital noise and unwanted artifacts, often caused by high ISO settings and low light conditions. It offers several ready-to-use profiles, that let you remove the most common noise problems instantly, without further configurations. In addition, you can also tweak the settings and specify your own, custom profiles or use the self-learning feature to create noise profiles automatically. Noiseware supports batch processing EXIF data support, JPEG/TIFF output, and embedded ICC support.
Imagenomic Portraiture.v1.0.1

Portraiture is a Photoshop plugin that eliminates the tedious manual labor of selective masking and pixel-by- pixel treatments to help you achieve excellence in portrait retouching. It intelligently smoothens and removes imperfections while preserving skin texture and other important portrait details such as hair, eyebrows, eyelashes etc.
Portraiture features a powerful masking tool that enables selective smoothening only in the skin tone areas of the image. What makes Portraiture’s masking tool truly unique is its built-in Auto-Mask feature. It helps you quickly discover most of the skin tone range of the image automatically and, if preferred, you can manually fine-tune it to ensure optimal results, providing unmatched precision and productivity.
For finer control, you can specify the smoothening degree for different detail sizes and adjust the sharpness, softness, warmth, brightness and contrast.
Portraiture comes with pre-defined presets for one-click effects and, as with all Imagenomic plug-ins, you can capture your own signature workflow in a custom preset tailored to your specific requirements and photographic portfolio.
Imagenomic RealGrain v1008

RealGrain, the third plug-in of the suite, adds the look of grain to a digital file and gives subtle shadow gradations and colors that are more natural when working with B&W, split toning, grain balance, and color fine-tuning.
Alien Skin Exposure v3.0.6.1145

Alien Skin Exposure - a powerful tool, as well as a plugin for Adobe Photoshop, designed for color correction and styling images to film color and b / w photos.But apart from imitation of a film, the plugin also has tools for common photo processing: Shadow / Highlights, Curves, Sharpen and more. The program gives digital photographs the cinematic sheen.
Unlike most plug-ins for Photoshop, this plug-in is a very important feature - they can use as a beginner amateur photographer using a plug-in default settings and professional photographer, displaying all the settings manually processed.
New in Exposure 3.0:
• Full support for 64-bit versions of Adobe Photoshop CS5 for Macintosh and Windows platforms
• Tight integration with Photoshop Lightroom, which does not require start-up or use Adobe Photoshop.
• Effects of aging photos, or the effect of old film, similar to that formed on the film and the Technicolor old Kodachrome
• Modeling Lo-Fi pictures
• Hundreds of new settings in all categories, which include more films, color and toning aging
• User interface improvements, such as increased speed up your preview and online help
• The ability to separate the diagonal preview windows, and sorry: (
Simple and intuitive interface
A. Menu
B. Bookmarks panel settings
C. Settings
D.Navigation area preview
E. User preferences
F. Separation of the preview into two halves: one - the original image, the other - Preview the results of the filter.
G. OK and Cancel (no comment)
H. Area preview
I.Control buttons thumbnails - show original picture (press and hold), move, zoom (click on thumbnails zooms, Alt-click - reduce, dablklik on the button - sets the scale of 100%, you can also select an arbitrary rectangular area,scale and position of the thumbnails to ascertain from the release)
Exposure 3 includes two parts - Black and White Film, and Color Film. With rare exceptions, configure both plugins alike.
Plug-ins contain the configuration tab:
Settings-You can choose one of the settings of the filter.Those that are included in the delivery, emulate the characteristics of a film. The selected settings can then be adjusted and stored them under his own name. The manufacturer's site to download some additional settings.
Color-checked on line Create Output In New Layer Above Current allows us to derive the result of the filter in a new layer, which is very convenient - the original is preserved.
Overall Intensity parameter controls the "degree of" filter - the result of the filter is applied to the original.The same effect can be achieved in the Photoshop, changing the transparency of the new layer with the filtered image of the original in overlay mode Normal. It is recommended to leave at 100%.
Options - Red, Green and Blue channels allow us to determine the effect on the final result.
Line Equalize Channels - the sum of intensities of each color is always 100% (when you change one parameter, the other two imenyayutsya automatically in the opposite direction), which allows you to save as a result of the overall brightness of the image.The filter is also allowed to set negative values ??of the intensities of channels. And, although again this effect in the real world is physically impossible, it can improve the contrast of the image.
Options Ink Color, Strength, Position allows toned image in any color.
Bookmark Tone will change the brightness of the image. With the help of some slide bars Contrast, Shadow, Midtone, Highlight You can change the contrast and brightness of the shaded areas, midtones and highlights.
Focus - helps simulate izmenenenie focal length while shooting.In practice, this conventional instruments Blur and Sharp.
Grain - will add grit to the possibility to adjust shadows, midtones, bright areas (parameters Shadow, Midtone, Highlight).
New bookmark Age - contains a number of effects to simulate the aging of the photos.Here you can change some parameters such as: vignetting, dust, scratches, roundness of faces, etc.

Lucis Pro is a patented image-processing application that gives artists incredible access to image content. Images often contain hundreds to tens of thousands of contrast levels. Our eyes can only differentiate 32 levels of contrast. Therefore, fine contrast variations are only partially recognized as textures our eyes can't resolve. With Lucis Pro, you shift the relative emphasis of image contrast variations. Emphasize small, midrange or large contrasts. Transform your digital photographs into your artistic vision.
Lucis® Pro 5.0 Features
*Faster Lucis processing
*Ability to process individual color channels with unique Lucis parameter settings
*Improved Preview Mode with movable preview image, color channel disabling, and contrast stretch disabling to allow easy, fast fine-tuning of the Lucis processing
*Improved Mixing Mode with preview image, easy image selection, movable preview window, and weighted addition and subtraction
*Image Resizing Mode
*Faster, more memory efficient image zoom
*Expanded toolbar
*Expanded image format support
*Ability to process individual color channels with unique Lucis parameter settings
*Lucis Pro is fast, easy to use, fun and flexible.
*There are only two sliders. One slider increases the emphasis of small contrast variations (detail).
*The second slider increases the emphasis of large contrast variations (large features).
*Using both sliders provides access to mid-range contrast patterns. Processing an image multiple times creates your own unique effects.
*Using the two cursors (sliders) in Preview Mode, select the range of contrast variances to view.
*Lucis compares each pixel to every other pixel along hundreds of radial lines in two directions to map out contrast variances.
*Contrast variances within the selected range are enhanced and contrast variances outside the range are diminished.
*The relative emphasis of contrast information is shifted, but information is not thrown away.
*Thus, Lucis reveals detail that other image-processing methods simply cannot.
*Lucis processing only effects the intensity information in an image.
*To process a color image, Lucis converts the RGB (Red, Green and Blue) information to HSL (Hue, Saturation and Luminance).
*Lucis processes the Luminance information, and then combines the new Luminance (L) with the unaltered Hue and Saturation.
*The HSL information is converted to RGB.
*Color images will experience interesting color shifts as Lucis extracts the image detail.
*Multiple Luminance Channel Processing
*Lucis Pro will transform the overall intensity information in the image using single luminance channel mode.Or, for custom results, you can choose to modify the intensity information on each RGB channel separately using Multiple Luminance Channel mode.
*The Preview Window for Multiple Luminance Channel Processing has a check box marked "Display Composite Image" directly under the preview window.
With that box checked, the preview window shows the combined result of the selected Lucis Processing.
*If the box is unchecked, then only the grayscale information of the selected channel will be visible.
*Looking at the grayscale information in each channel can give you valuable information about how the image will look when the composite button is selected.
*You can look at the balance of detail and color in each channel and manage the variation. If you are enhancing a portrait, then you would want approximately the same amount of contrast and detail in each channel.
*This does not mean that you process each channel with the same settings.
*When you think each channel has a balance of contrast and detail, check the composite button to view the result.
*If the image has too much of one color, then select that channel and either move the Big Cursor Slider to the right or the Small Cursor Slider to the left to fine-tune the color and detail.
*Reduce Image Noise
Smoothing the blue channel a small amount improves image quality, as noise is usually located in the blue channel.
*Enhance Features
If you have an image with a striking feature that primarily uses only one color, try using Multiple Luminance Channel mode and only enhance that one color.
For example, you might have a picture of a robin and only enhance the red.
*If you are using this method, uncheck the boxes marked "C" in the User Interface or else the remaining luminance channels will be contrast-stretched.
*A simplified, "lite" version of Lucis Pro is available called LucisArt.
*It is an Adobe Photoshop plug-in for Mac and Windows (discount available).
*Here are the key differences between Lucis Pro and LucisArt:
*Lucis Pro 5.0 is Windows only. It is stand-alone software (not a Photoshop plug-in).
*Lucis Pro 5.0 allows full access to image content. While LucisArt has seven buttons to enhance detail with the effect Exposure, Lucis Pro has a slider that you can alter in increments of 2 intensity levels.
*That is like having 125 setting for a typical photograph. A smoothing slider, equivalent to the slider in Winslow, is also present at the same time, so you can enhance features and also smooth the smallest contrasts.
*It is like having acess to 15,000 sculptures.
*Lucis Pro also allows you to alter the intensity information for each RGB channel separately (Multiple Luminance Channel processing).
*This allows for incredible detail and color pattern shifts.
*All of the color and features in an image are created because of how the three RGB grayscale intensity image channels overlap.
*If you change each individual RGB grayscale intensity channel they will overlap differently, affecting detail and color.
*But this does not create overall color shifts. Instead, beautiful splashes of color appear.
*Lucis Pro 5.0 has a Mix feature which allows you to add a percentage of an image to another or subtract a percentage of one image from another provided that the images are the same size and format.
*There are some amazing tricks you can do with subtraction to create highlights.
*When Lucis Pro 5.0 processes an image it creates a new one, and does not overwrite the original as LucisArt does.
*So you can create a palette of images that you can import into Photoshop and blend using layers.
*Lucis Pro 5.0 handles 8-bit RGB color and 16-bit grayscale. It can read TIFF and JPG files. It cannot read PSD files. The output from Lucis Pro is always 8 bit. LucisArt processes 8-bit RGB color and grayscale files including PSD files.
Download <<<


nice share thx...
BalasHapus